
Every action on Solana, from a simple transfer to a complex swap, is a transaction.
Let’s break down how they work and what you need to know to use them well.
Prefer watching? Check out the video version: Everything About Solana Transactions in 17 Minutes.
Table of contents
Open Table of contents
What Is a Solana Transaction?
A Solana transaction is just a signed order you send to the blockchain to change its state.
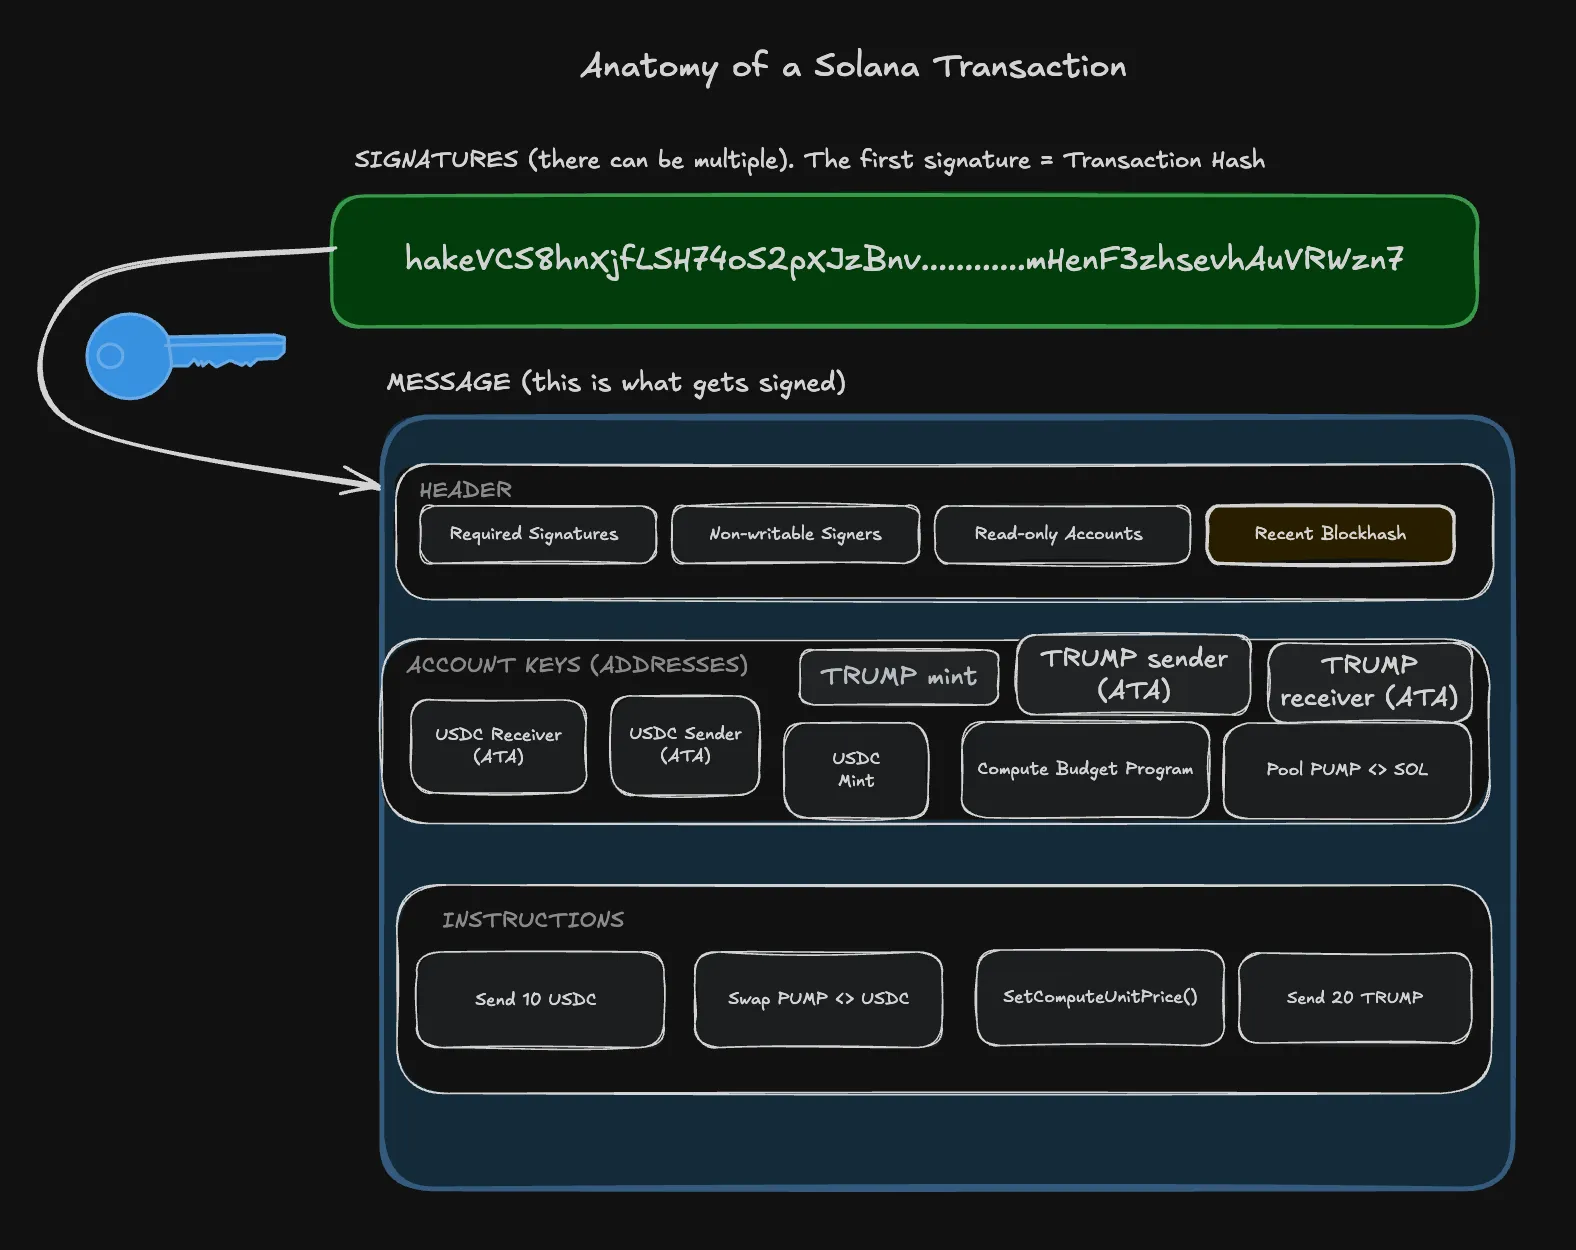
A transaction has two parts: the message and the signatures.
The message is the “what”, representing all the data the blockchain needs to execute the instructions.
The signatures are the “authorization”, the cryptographic proof that every required signer has verified and approved it.
Message
The message has everything the blockchain needs to execute your transaction, split into four parts: the header, account keys, recent blockhash, and instructions.
| Section | Purpose |
|---|---|
| Account Keys | Every address your instructions will interact with |
| Header | Contains the number of required signatures, read-only signed accounts, and read-only unsigned accounts |
| Recent Blockhash | A hash of a recently produced Solana block |
| Instructions | The commands your transaction will execute, like transferring tokens or swapping on a DEX |
Instructions in Solana
Instructions are individual commands that tell the blockchain what to do. A transaction can carry one or many of them.
For example, “transfer 10 USDC from Alice to Bob” is one instruction. But you could add a second instruction that sends SOL to Charlie, and a third that swaps tokens on a DEX. They all go out together as one transaction.
Think of it like a to-do list:
- Go to the supermarket
- Pick up your brother from boxing
- Drop off a package at the post office
Each task is an instruction, and the entire list is the transaction.
All instructions in a transaction execute atomically.
If any one fails, everything rolls back. This means you can do things like create a token account, mint tokens into it, and transfer some of them, all in a single transaction.
Transaction
├── Instruction 1: Send 10 USDC to Alice
├── Instruction 2: Send 20 TRUMP to Bob
└── Instruction 3: Swap 5 SOL → USDC
Account Keys
The account keys list every account your transaction will modify or read.
For example, sending USDC requires these account keys:
- The USDC mint address
- The sender’s associated token account (ATA)
- The receiver’s associated token account (ATA)
Solana requires you to declare every account upfront because this is how it achieves parallelism. If the validator knows which accounts each transaction needs, it can process thousands of transactions in parallel as long as they don’t overlap.
If two transactions interact with completely different accounts, validators can execute them simultaneously.
The order of accounts in the accounts list is not random. It is strictly defined and critical for Solana to process the transaction correctly.
Solana does not label accounts individually. It relies entirely on their position in the list combined with the header numbers to determine each account’s role.
Header
The header contains three fields that tell Solana how to interpret the account keys list and validate the transaction:
- Number of required signatures
- Read-only signed accounts
- Read-only unsigned accounts
These three numbers act as split points on the account keys list to determine the role of each account.
For example, we have a transaction with:
- Required Signatures = 2
- Non-writable Signers = 1
- Read-only Accounts = 2
And the account keys (which are just Solana addresses):
[Alice, Bob, Charlie, PriceProgram, TokenProgram]Solana uses the header numbers as split points on that list to determine the role of each account:
-
Required Signatures = 2: The first 2 accounts in the list [Alice and Bob] are signers. Solana expects a valid signature from each of them (in the signature section). If either is missing, the transaction is immediately rejected.
-
Non-writable Signers = 1: Of those 2 signers, the last 1 [Bob] is non-writable (the order is first writable signer, then non-writable signer). This means Bob can authorize the transaction but his account data cannot be modified during execution.
-
Read-only Accounts = 2: The last 2 accounts in the list [PriceProgram and TokenProgram] are read-only. PriceProgram and TokenProgram can be referenced during execution but never modified.
That leaves Charlie in the middle, not a signer and not read-only, which makes him a writable non-signer. His account data can be freely modified during the transaction.
If the order of accounts were different, the entire grouping would change. Solana does not label accounts individually. It relies entirely on their position in the list combined with the header numbers.
In practice, you rarely need to think about account keys or their order. SDKs like @solana/kit sort and group them for you.
The Blockhash
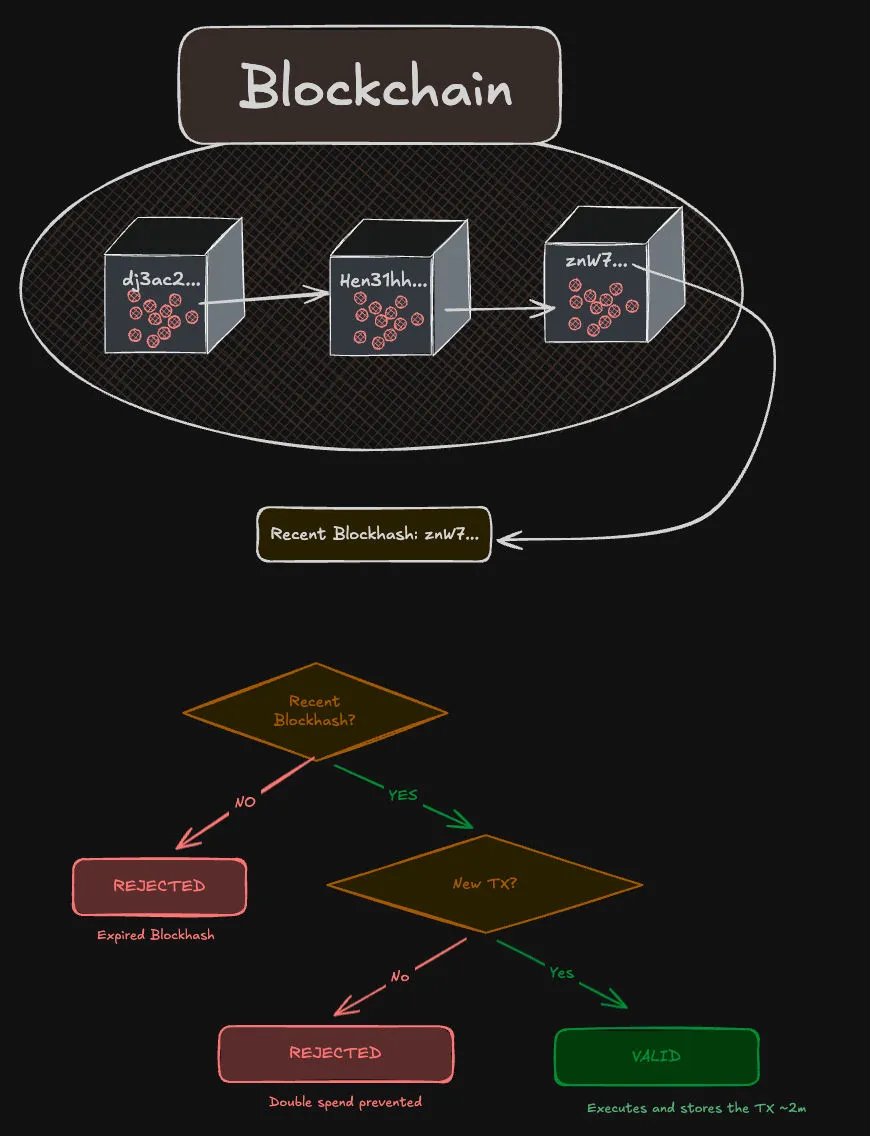
Every transaction must include a recent blockhash, a reference to one of the latest blocks on the chain. This serves several critical purposes:
Expiry
If the blockhash is older than ~60 seconds (~150 slots), validators reject the transaction immediately. This serves two purposes.
First, it’s a cheap spam filter. Validators can drop stale transactions before doing any expensive signature verification or account lookups.
Second, it prevents “zombie transactions.” Without expiry, a signed transaction that failed to land could get resubmitted much later, when your account state is completely different. You might have already spent those tokens, or prices might have moved against you, but your valid signature is still attached. Say you sign a transaction to swap 100 USDC for SOL at $150. The transaction doesn’t land. Three days later, someone resubmits it. SOL is now $120, but your old transaction still says $150. You just overpaid, and there’s nothing you can do about it.
Expiry means a signed transaction has a short window to land. If it misses that window, it’s dead and you’re free to sign a new one that reflects your current intent.
Deduplication
The blockhash does double duty here. Since it’s part of the transaction itself, two identical transfers sent a minute apart will have different blockhashes, making them completely different transactions. So you can’t replay an old transaction because its blockhash will have expired.
But what about the same transaction being submitted twice within the same 60-second window? Say your app sends a payment, doesn’t hear back in time, and fires it off again. Both copies have the same blockhash, the same signatures, the same everything — they’re byte-for-byte identical.
This is where validators step in. They keep a short-term list of every transaction signature they’ve recently processed. When the second copy arrives, they recognize they’ve already seen it and toss it out.
These two mechanisms work together. Validators only need to remember ~60 seconds of transaction history, because anything older than that gets rejected for having an expired blockhash anyway. No need to maintain a list of every transaction ever processed.
Durable Nonces
The ~60-second blockhash expiry means every signature must happen within that window.
The blockhash is part of the transaction message, which is what each signer signs. So if the blockhash expires, every signature becomes invalid and you have to start over.
This is a problem for several use cases:
-
Multisig wallets. If three people need to sign a transaction, they all need to coordinate within 60 seconds. The first signer picks a blockhash, and everyone else has to sign the same message (with the same blockhash) before it expires.
-
Offline or air-gapped signing. Cold wallets and hardware wallets kept in secure environments can’t sign on demand. Moving a transaction to an air-gapped machine, signing it, and moving it back can easily take longer than 60 seconds.
-
Deferred execution. Scheduled transactions, approval workflows, or anything where signing and submission happen at different times. You can’t pre-sign a transaction today and submit it tomorrow if the blockhash expires in a minute.
The solution: durable nonces. Instead of using a recent blockhash, you use a nonce value stored in an on-chain account.
The transaction stays valid until that nonce is consumed, not until a blockhash expires. You can sign today and execute next week.
Signatures: Who Needs to Sign and Why
When you click “Confirm” in Phantom or any wallet, you’re signing the transaction message with your private key.
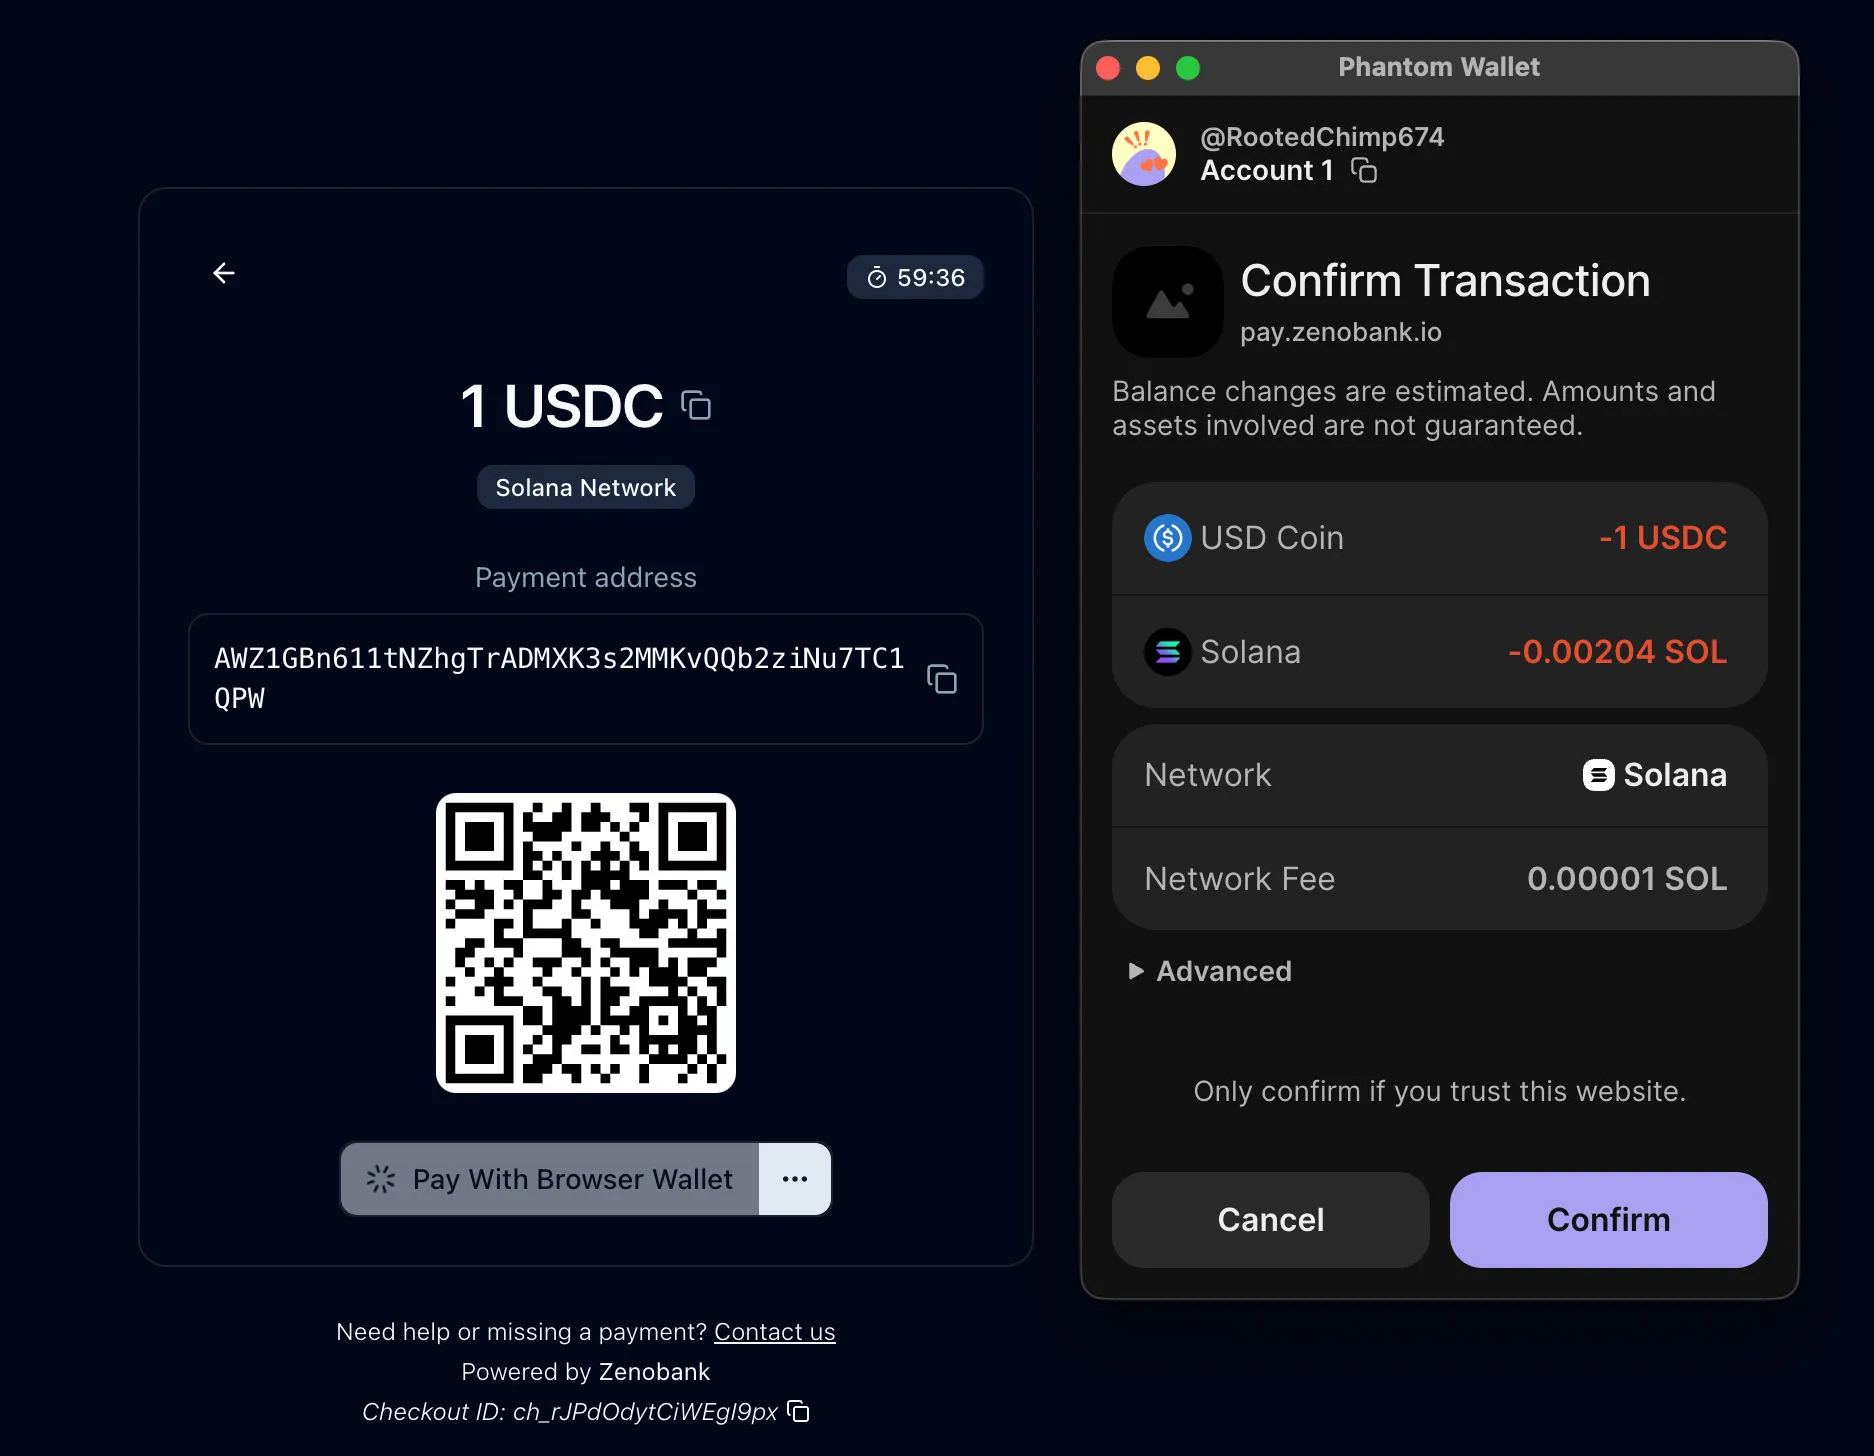
The signature proves that you, the owner of the account, authorized this specific transaction. Without it, anyone could craft a transaction that moves your tokens.
When a validator receives the transaction, it checks that each signature matches both the signer’s public key and the exact transaction data. If anything is off, the transaction is rejected outright.
When Do You Need a Signature?
You only need a signature for accounts that the transaction will change. If an account is read-only, no signature is needed.
Think of it this way: reading someone’s public balance is free. But moving tokens out of their account? That requires their permission.
In Solana, every account is owned by a program. A program can write to any account it owns. So if a program owns both the source and destination accounts, only one signer (the user) is needed. The program handles the rest.
This is why a simple USDC transfer only needs one signer, the sender. The Token Program owns both the sender’s and receiver’s token accounts. When the sender signs, the Token Program has everything it needs to move the tokens.
You need multiple signers when a transaction touches accounts controlled by different private keys.
Transactions That Require More Than One Signature
Most transactions on Solana only need one signature. But sometimes a transaction involves two different wallets, each controlled by a different private key. When that happens, both wallets need to sign.
Let’s look at two real examples where this comes up.
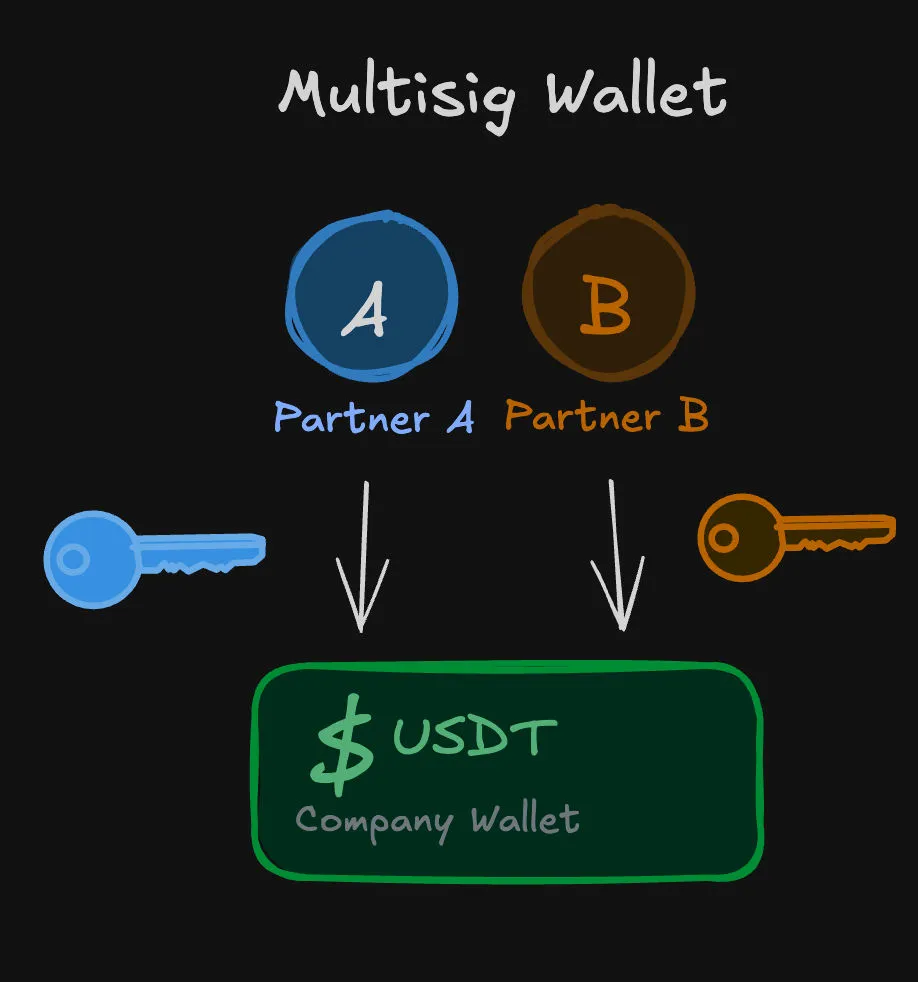
Multisig Wallets
Imagine a wallet shared by two people. Both need to sign before any funds can move.
Neither can act alone, which is exactly the point.
The “Sugar Daddy” Transaction
Imagine you have a wallet with USDC on Solana, but it has zero SOL. You can’t move the USDC because you don’t have SOL to pay the blockchain fees. Let’s call this the Sugar Baby, and another wallet with tons of SOL the Sugar Daddy.
To move those tokens out, we need to build a transaction with two signatures. Why two? Because two different wallets are involved, and each one needs to agree to do its part.
The first signature comes from the Sugar Baby. She signs to prove she owns the USDC and to say “yes, move my tokens.” But she can’t send this transaction on her own. She has no SOL to pay the fee.
The second signature comes from the Sugar Daddy. He signs the same transaction as the fee payer. His SOL covers the cost. He is saying “I’ll pay for this.”
The result is a gasless transaction for the Sugar Baby. Her USDC moves, and she never needed a single lamport of SOL.
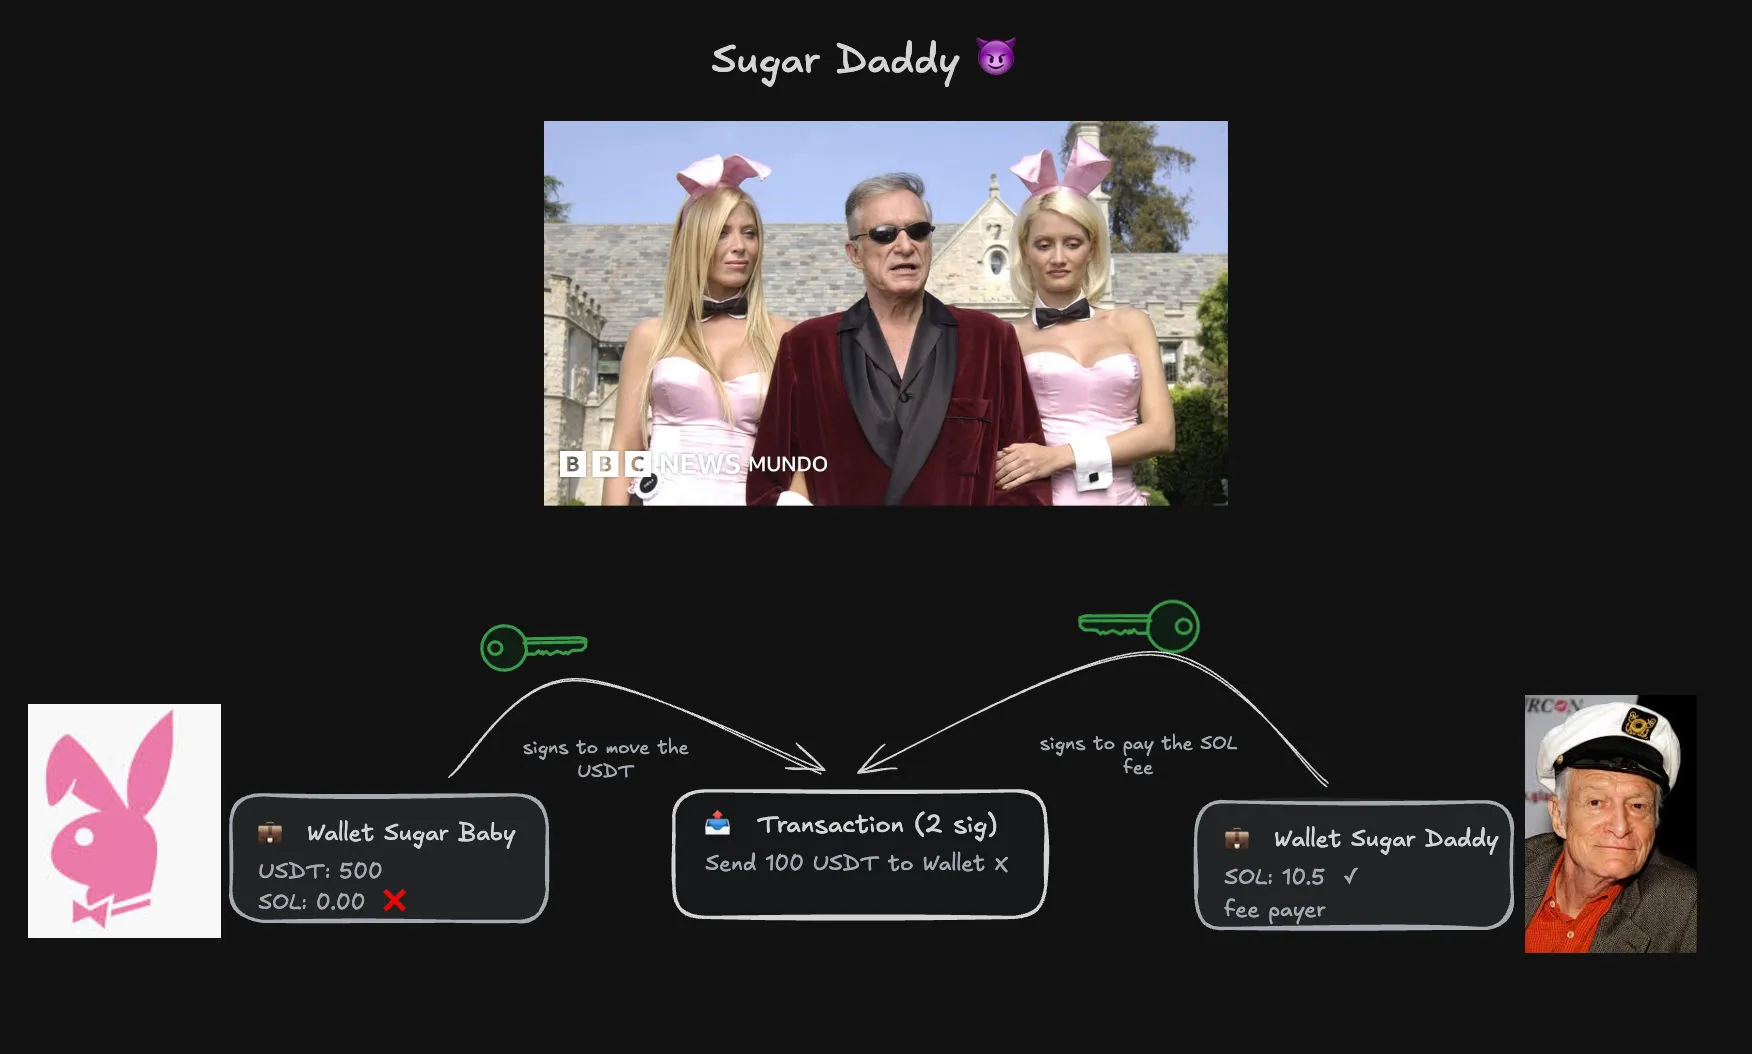
At Zenobank, this pattern is essential. We generate thousands of intermediary wallets, one for each payment. When a user buys something in a store, we give them one of these wallets to send the payment to.
Sure, we could fund each of those wallets with SOL individually, but the Sugar Daddy pattern is simpler: a single wallet sponsors every sweep transaction across all intermediary wallets, letting us handle everything in one go.
Thousands of Sugar Babies, one Sugar Daddy paying the fees for all of them.
The transaction hash you see on Solscan is just the first signature. Even if a transaction has multiple signers, only that first one becomes the transaction ID. And the first signer is always the fee payer — the account covering the blockchain fees.
Fees: What You Pay and Why
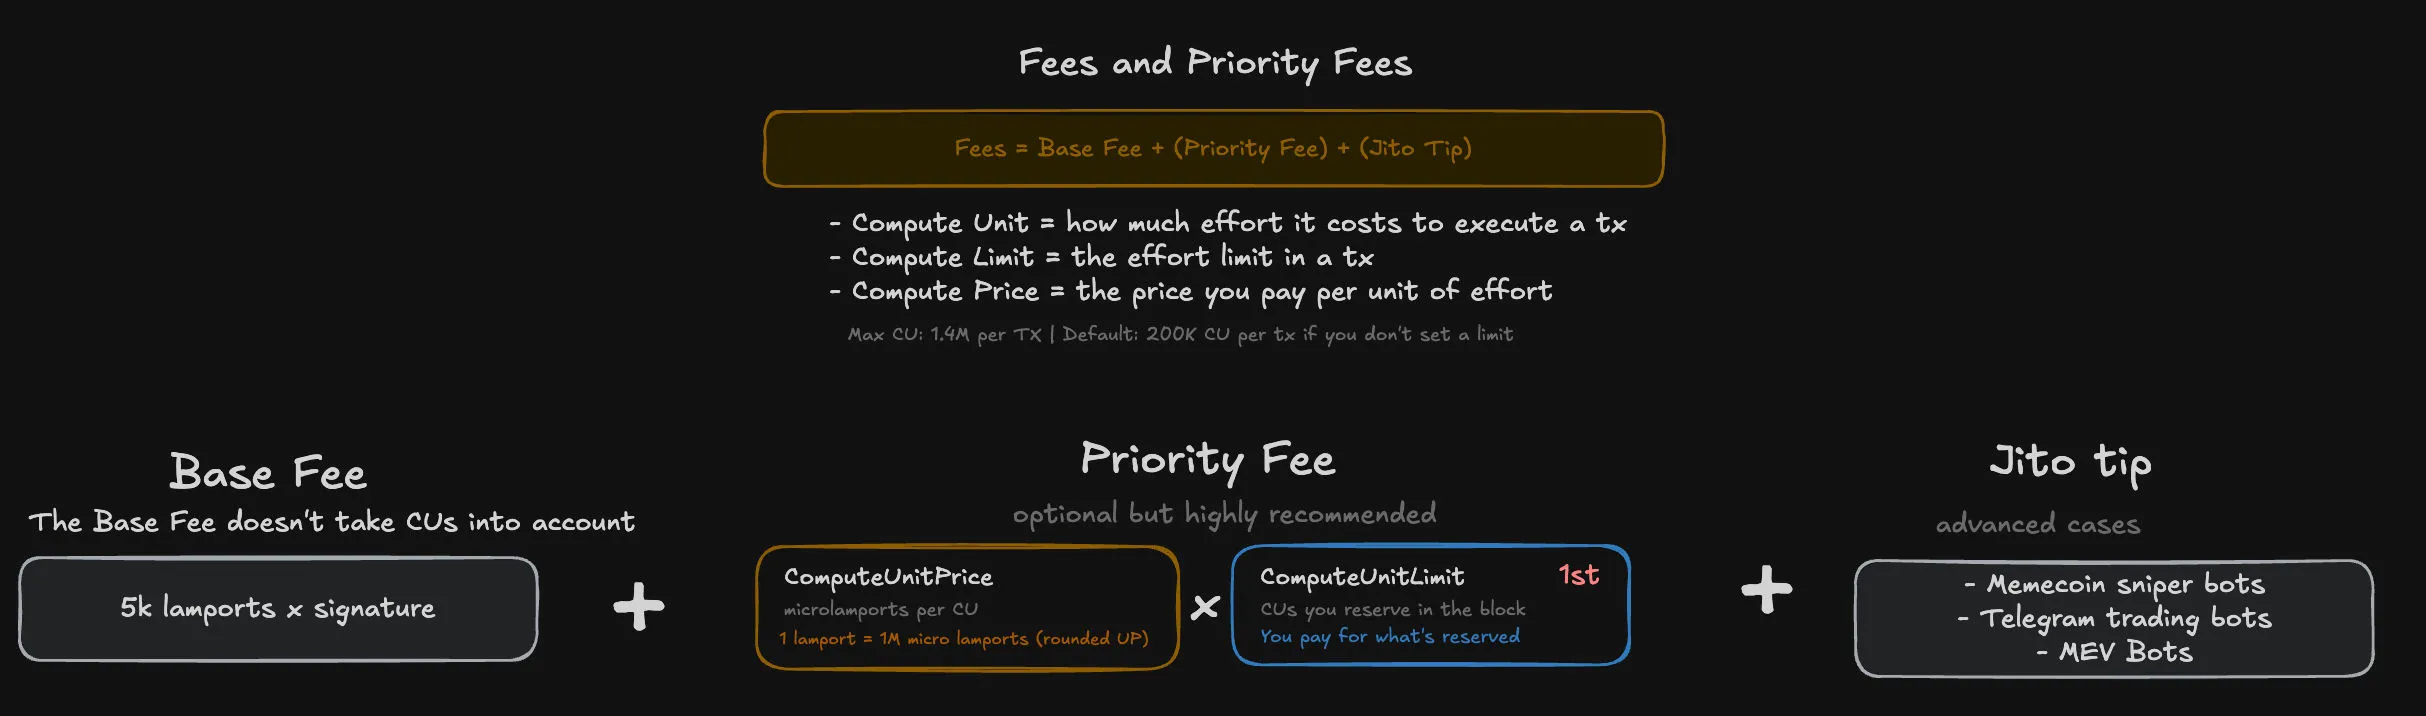
Validators do real work to process your transaction — they verify signatures, execute your instructions, and write the results to the chain. Fees compensate them for that work. You pay three kinds:
Base Fee
Every signature costs a flat 5,000 lamports. A lamport is the smallest unit of SOL — one SOL equals one billion lamports. So one signature costs 5,000 lamports, two signatures cost 10,000. Doesn’t matter how complex your instructions are.
Priority Fee
Every transaction on Solana used to pay the same flat base fee. The problem was that sending failed transactions was extremely cheap.
So when a MEV opportunity appeared, the strategy was simple: blast the network with millions of transactions hoping one would land at the right moment. Think of it like sperm cells racing toward an egg. Millions try, but only one makes it.
Now, if a transaction fails but is still included in a block, the network “saw” it and a validator tried to run it, but something went wrong (slippage error, instruction failed, etc.). Since the validator used computational power to process it, you still get charged the full fee (base + priority).
But back then, with no priority fees, that cost was practically nothing. So spamming millions of failing transactions had almost zero consequences.
This flooding resulted in congestion, downtimes, and blockchain outages. Priority fees were introduced to solve exactly that.
The formula:
priority fee (lamports) = compute unit price (micro-lamports) × compute unit limit / 1,000,000Compute units (CU) measure how much work your transaction requires. A simple SOL transfer is cheap. A multi-hop swap through three DEXs is expensive. It’s the difference between a 5K jog and a full marathon, same activity, wildly different effort.
You control two variables via instructions:
SetComputeUnitLimit, the max CU your transaction can consume (default: 200,000)SetComputeUnitPrice, how much you pay per CU in micro-lamports
But here’s the catch: this doesn’t work like Ethereum. Priority fees on Solana are more like a minimum you have to pay for your transaction to be processed.
Since Solana doesn’t have a mempool, paying a higher priority fee doesn’t always mean your transaction will land first. The network is so fast that it’s less about bidding for position and more about meeting a threshold to get through the door.
So if priority fees don’t guarantee ordering, how do you actually get your transaction prioritized? That’s where Jito tip fees come into play.
The Priority Fee Sweet Spot
How much do you pay to make sure your transaction lands? Too low and validators ignore it. Too high and you’re burning SOL for nothing. There are two ways to find the sweet spot:
- The hard way: Call
getRecentPrioritizationFeeson the RPC and calculate the right fee yourself based on recent network activity. The problem is that this only gives you the raw fees of recently landed transactions. It doesn’t account for the specific account keys your transaction touches. Remember, Solana parallelizes execution, so some programs may be heavily congested while others are not. Your instructions, your accounts, your specific transaction context: all of it matters. Figuring this out manually is painful. - The easy way: Use a fee estimation API. You send your serialized transaction, and it returns a recommended price based on current network conditions. There are plenty of options available. At Zenobank, we use the Helius Priority Fee API.
Jito Tips
For high-frequency trading, MEV, or sniping bots, there’s a third fee layer: Jito tips. These go directly to validators running the Jito client for guaranteed inclusion and ordering within a bundle. If you’re building any of these, Jito tips are fundamental. This is a deep topic on its own, and I’ll cover it in a dedicated article.
From Send to Confirmed: The Transaction Lifecycle
Here’s what happens after you hit send:
You → RPC Node → Leader Validator → Block → Network Confirmation- Your wallet sends the signed transaction to an RPC node.
- The RPC runs a preflight check, a quick simulation to catch obvious errors (bad signature, insufficient SOL, expired blockhash). If it fails, you get an error back immediately.
- The RPC forwards the transaction to the leader, the validator currently producing the block.
- The leader executes your instructions and includes the transaction in the block.
Stake-Weighted QoS: The Nightclub Analogy
When the network is quiet, every transaction gets through. But during a memecoin frenzy, like when Trump launched his token, Solana gets packed.
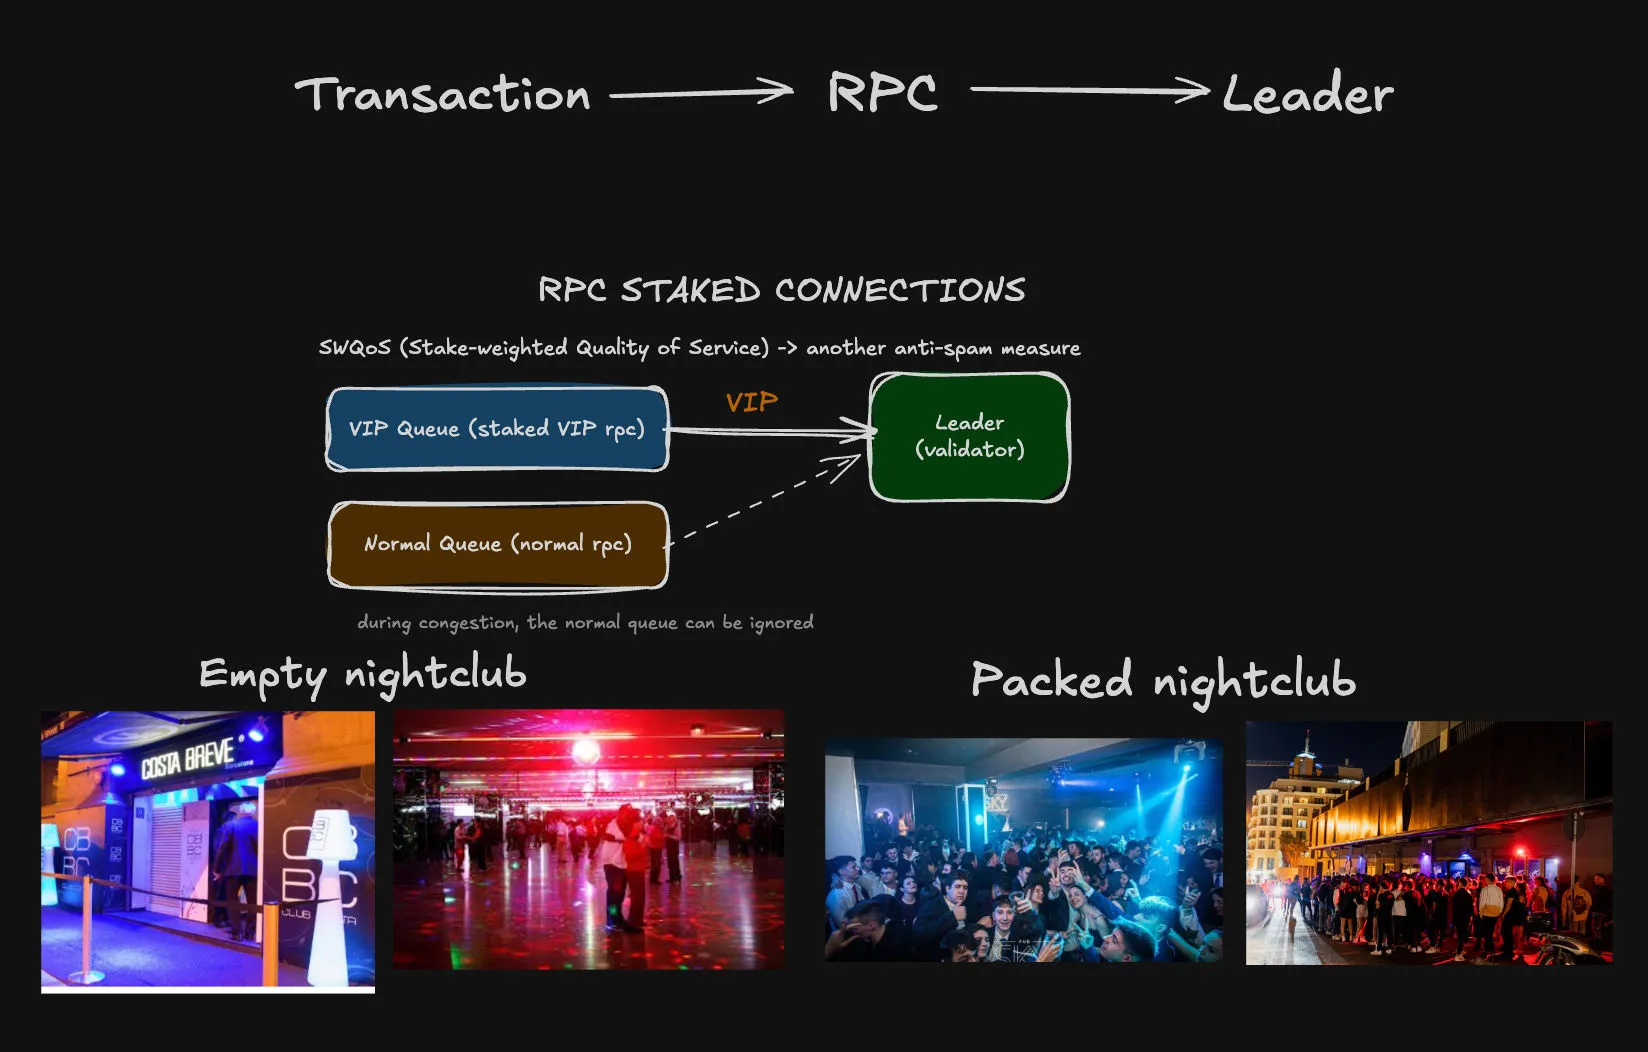
This is where Stake-Weighted Quality of Service (SWQoS) kicks in. Landing a transaction on Solana isn’t just about priority fees. It’s also about how your transaction reaches the leader.
On Solana, when your RPC node sends a transaction, it forwards it to the current leader, the validator producing the next block. The leader has to decide which transactions to process, and it prioritizes transactions coming from stake-weighted RPCs: nodes with SOL staked on them.
The more SOL a node has staked, the more bandwidth the leader allocates to it. Transactions from unstaked RPCs get pushed to the back of the line or dropped entirely during congestion.
It’s like a nightclub on a packed Friday night. Regular people wait in line and might never get in. But if you know the owner, you skip the line entirely.
The more connected you are, the faster you get through. Staked RPC connections are that VIP access. They have tons of SOL staked, so the leader always lets them through first.
If you’re building anything that needs reliability during congestion, a staked RPC connection is not optional. It’s essential.
Preflight vs. Simulation
Preflight is a fast mechanism that your RPC node performs before forwarding your transaction to the leader. By default, every time you send a transaction, the RPC runs a preflight simulation automatically.
It checks for obvious errors before your transaction even hits the network: does the fee payer have enough SOL to cover the fees? Are all required signatures present and valid? Will the transaction pass?
If any of these checks fail, the RPC rejects the transaction immediately and saves you the cost of a failed on-chain transaction.
Simulation is different. You call the RPC directly to simulate your transaction without actually submitting it.
| Preflight | Simulation | |
|---|---|---|
| When | Automatic, before sending | On-demand, you call it explicitly |
| Detail | Full simulation, blocks send on failure | Full simulation, never submits |
| Sends to chain? | Yes, if it passes | No, dry run only |
Simulation gives you the full log trace, compute units consumed, and detailed error messages if something goes wrong. It’s a dry run of your transaction against the current state of the blockchain.
For most applications, the default preflight is enough. But if you need deeper debugging, simulate manually before sending to get full logs and catch errors early.
On the other hand, if you’re building high-performance bots where every millisecond counts, disable preflight entirely (skipPreflight: true) and handle errors yourself. Those extra milliseconds can be the difference between landing a trade and missing it.
Retry Strategy
When you send a transaction, the RPC doesn’t just fire it once and forget about it. By default, it automatically resends your transaction to the leader every 2 seconds until the blockhash expires.
If the first attempt didn’t land, the RPC tries again, and again, every 2 seconds. For casual use, this is fine.
But for critical applications like a MEV bot, 2 seconds between retries is an eternity. By the time your second attempt goes out, the opportunity might already be gone.
The solution is to take control of the retry logic yourself:
await connection.sendRawTransaction(signedTx, {
  skipPreflight: true,
  maxRetries: 0, // disable automatic retries
});

// Retry manually every 100ms
By setting maxRetries: 0, you tell the RPC to send the transaction once and stop. From there, you implement your own retry loop, resending the same signed transaction every 100 milliseconds instead of waiting 2 seconds.
That’s 20 attempts in the same time the default strategy would have made just one.
During congestion, this aggressive retry cadence dramatically increases your chances of landing the transaction before the blockhash expires.

Finality: When Is It Really Done?
After the leader includes your transaction in a block, how sure can you be that it sticks?
| Level | Time | Meaning | Risk |
|---|---|---|---|
processed | ~400ms | Leader included it in a block | If the leader crashes, gets disconnected, or the network forks, the block disappears and your transaction with it |
confirmed | ~5s | 2/3 of validators voted the block is valid | Extremely unlikely to revert |
finalized | ~12s | 2/3 voted and 31 blocks built on top | Irreversible |
For high-performance applications like a Solana Telegram trading bot, processed is enough. You need speed, and the risk of a leader dropping the block is minimal in practice.
For user-facing apps, confirmed is the sweet spot: fast enough for good UX, safe enough for real money.
Use finalized when you need absolute certainty (large transfers, cross-chain bridges).
Fun fact: validator votes are themselves transactions on the blockchain. Every time a validator votes to confirm a block, it submits an actual transaction to the network.
This means that a significant portion of Solana’s transaction count comes not from user activity, but from validators voting on blocks.
So when you see Solana processing thousands of transactions per second, a large chunk of those are just validators saying “yes, this block is valid.”
Legacy vs. Versioned (V0) Transactions
Every Solana transaction has a hard size limit of 1,232 bytes. That’s it. Everything has to fit in there: signatures, account addresses, instructions, all of it.
In legacy transactions, every account is stored as a full 32-byte public key. With that overhead, you’re limited to around 35 accounts per transaction.
For a simple SOL transfer or a basic token send, that’s plenty. But for complex DeFi operations like multi-hop swaps that touch dozens of accounts across multiple programs, you hit that ceiling fast and your transaction simply won’t fit.
Versioned transactions (V0) solve this with Address Lookup Tables (ALTs). An ALT is a Solana account that stores a list of addresses on-chain.
Instead of embedding every full 32-byte address in your transaction, you reference the lookup table and pass a 1-byte index pointing to the address you need.
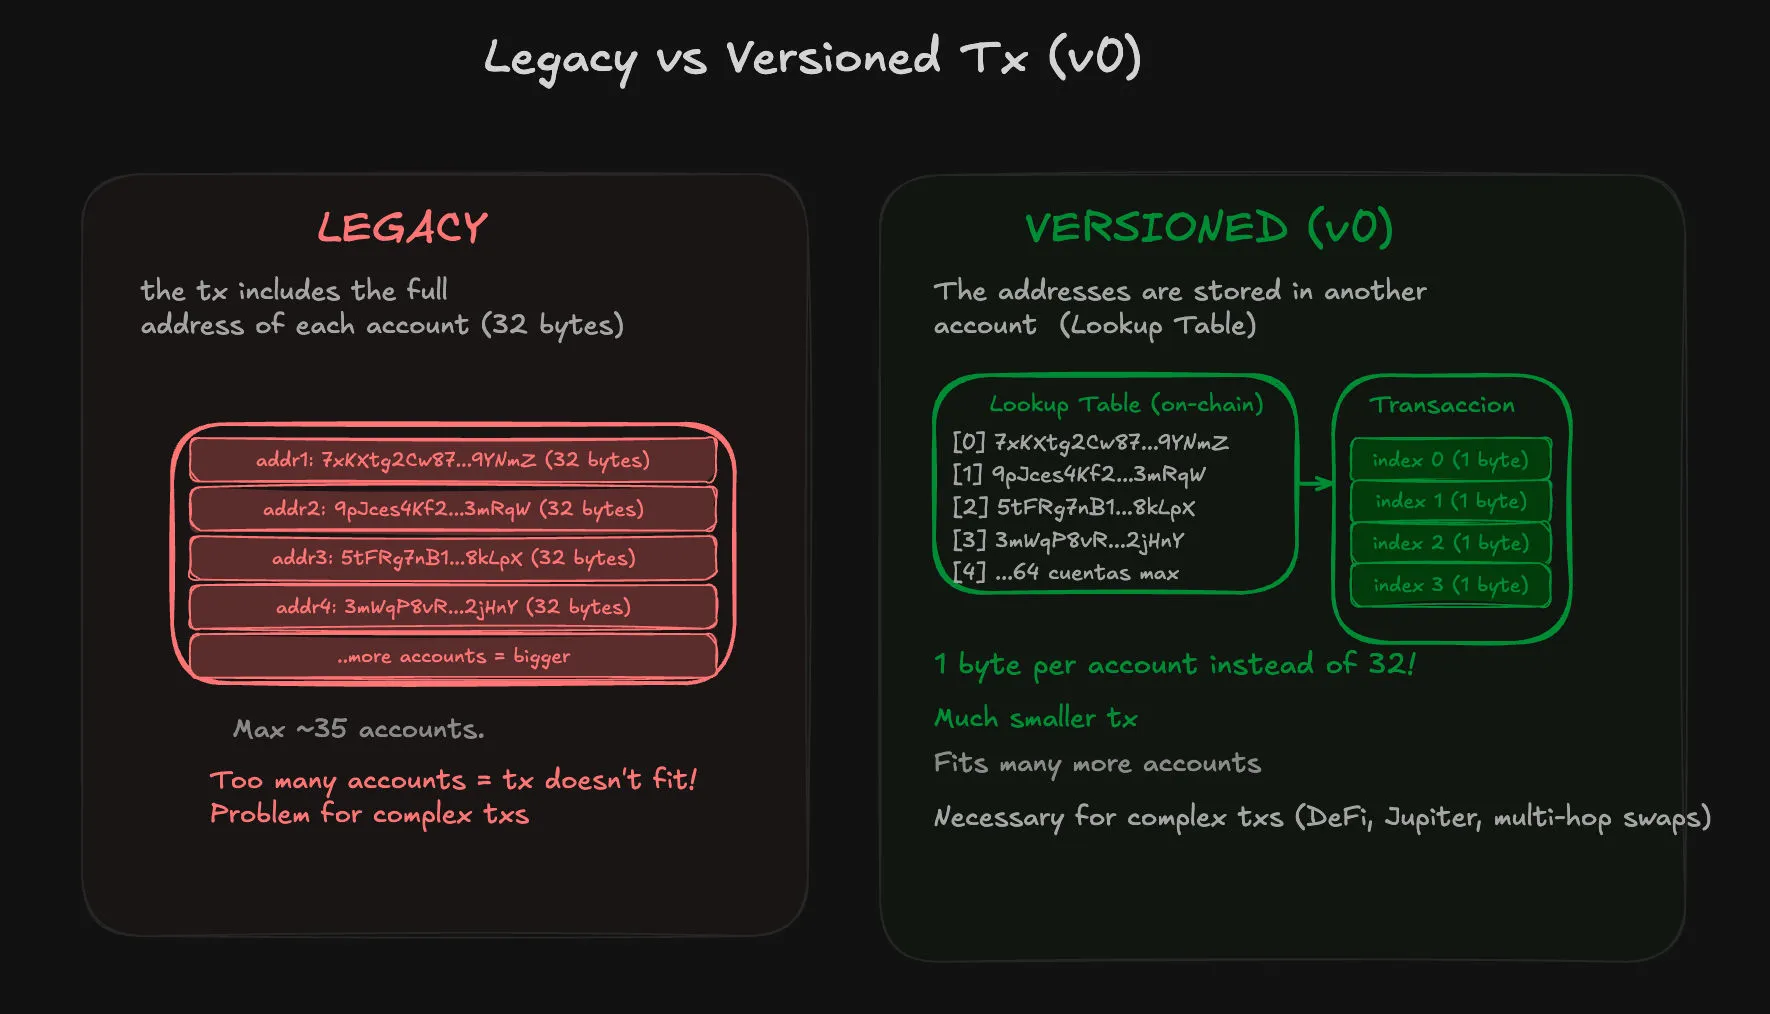
You create a lookup table once with the addresses you frequently use, then reference it in every transaction. The same accounts that would have eaten up your entire transaction size now cost almost nothing.
Which should you use? If your transaction fits within 35 accounts, it doesn’t matter. Legacy and V0 behave identically. For anything complex, V0 is mandatory.
Transaction Metadata
After a transaction executes, whether it succeeds or fails, Solana generates a complete metadata record of everything that happened.
This includes success or failure with the exact error if something went wrong, fees paid, SOL and token balances before and after execution, program logs, and compute units consumed.
This metadata is what powers everything you see on block explorers like Solscan. When you look at a transaction and see the token transfers, the fee breakdown, the error messages, all of that comes from the metadata.
On Solscan, click “Raw” on any transaction to see the full metadata object yourself.
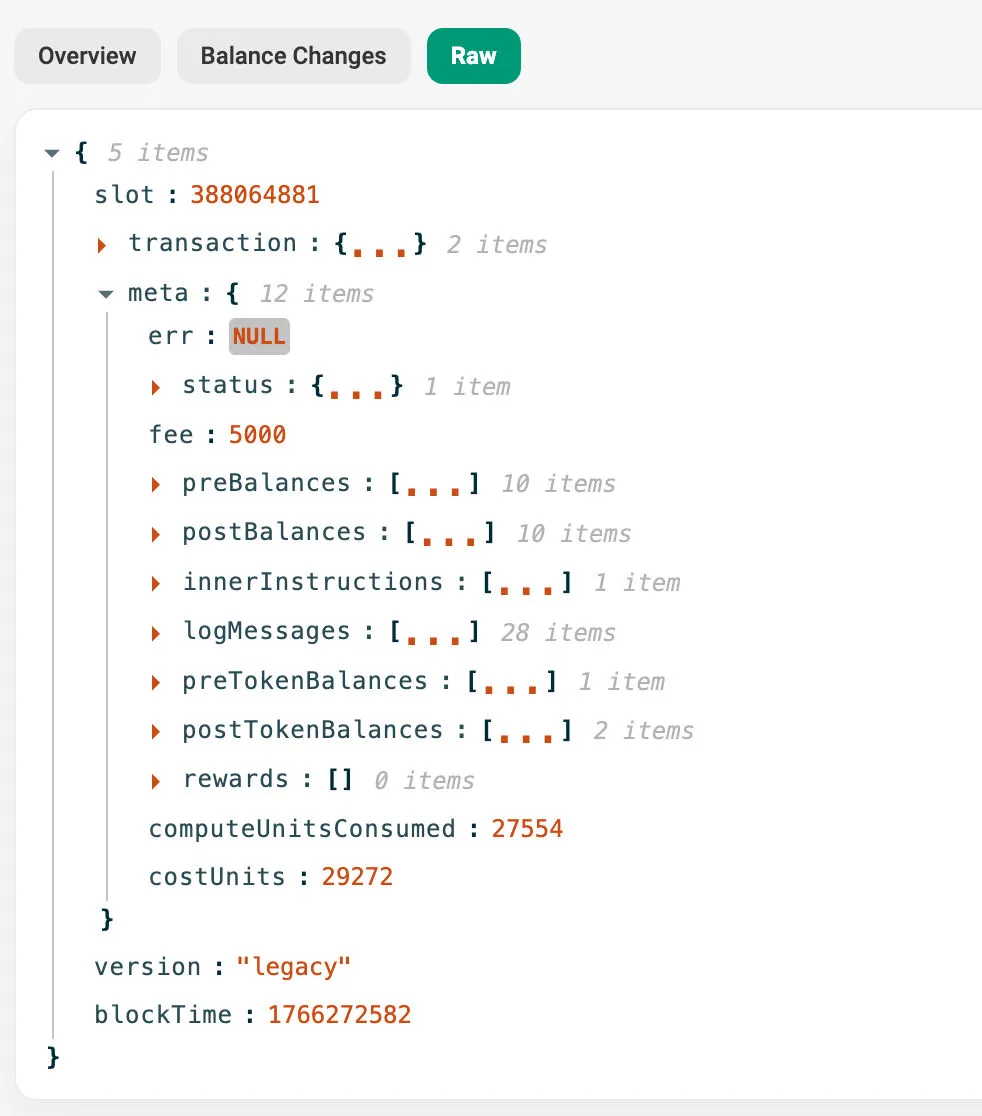
You can use this metadata to debug failed transactions by reading the exact error and logs, track token movements by comparing before and after balances, and monitor your fee spending across thousands of transactions.
At Zenobank, we parse this metadata to confirm that payments landed correctly.
Most RPC nodes, like the ones your wallet connects to, only keep the last few days or weeks of this metadata. After that, they prune it to save disk space.
Then there are archive nodes, which keep the metadata of every transaction ever processed. When you look up a transaction from a year ago on Solscan and see the full token balances and logs, that data comes from an archive node.
Putting It All Together
- The transaction is built with instructions, account keys, and a recent blockhash.
- One or more signers sign it, depending on what the instructions require.
- For critical apps, preflight and auto-retries are disabled. The transaction is then sent to an RPC node.
- The RPC forwards it to the leader, who executes it and includes it in a block.
- The network confirms it through validator votes, eventually reaching finality.
- Metadata is generated, giving a full audit trail of the execution.
Watch the full breakdown with visuals: Everything About Solana Transactions in 17 Minutes.